

Paraglider Maintenance: Why It Matters, When to Inspect, and How to Keep Your Wing Airworthy
Your paraglider isn’t just gear—it’s your aircraft. Every line, panel, and stitch directly impacts your safety, performance, and confidence in the air.
Yet one of the most common—and preventable—mistakes pilots make is waiting too long to inspect or trim their wing.
Paragliders should be inspected every 100–150 flight hours or at least every 12–24 months, with an initial trim check on a new wing recommended within the first 50 hours of use. Regular maintenance—including line measurement, porosity testing, and fabric strength checks—ensures the wing remains safe, performs correctly, and stays airworthy. Skipping inspections can lead to hidden damage, reduced performance, and increased risk during flight.
This guide explains:
- Why paraglider maintenance is critical
- How often to inspect your wing
- When to perform your first laser trim
- What happens during a professional inspection
- What “un-airworthy” paraglider inspection result actually means
Why Paraglider Maintenance Is Critical
Paragliders are constantly exposed to:
- UV radiation
- Mechanical stress
- Dirt and abrasion
- Moisture and humidity
- Repeated load cycles
Even if your wing looks perfect, internal degradation is always happening.
Manufacturers like Niviuk and NOVA emphasize that regular inspections are required to maintain airworthiness.
“Careful paraglider maintenance… will ensure continued top performance.” — Niviuk
“Skipping inspections may invalidate airworthiness” — NOVA
What Regular Maintenance Prevents
- Safety critical equipment failures that are often overlooked such as damaged lines or fabric
- Performance loss in glide and speed
- Dangerous line shrinkage
- Unpredictable collapses
- Reduced resale value
Expert Insight: Real-World Trim Degradation
According to 406 Paragliding technician Scott:
“Many pilots wait too long to have their wings trimmed. Over time, lines shrink and the wing’s profile becomes deformed. That deformation puts uneven stress on the fabric, and even after trimming, the upper surface may never fully return to its original shape.”
He adds:
“It’s actually rare that we find a wing that is truly un-airworthy—but we often see wings that are well past optimal performance because maintenance was delayed.”
How Often Should You Inspect Your Paraglider?
Across major brands like Ozone, GIN, Niviuk, and NOVA, the recommendations are consistent:
Standard Inspection Schedule
- Every 100–150 flight hours
- Every 12–24 months
- Immediately after any incident or hard landing
Manufacturer Guidance
- Niviuk: Inspection every 100 hours or 2 years
- NOVA: Same interval, stricter for heavy use
- GIN: ~150 hours / 24 months (shorter for school/tandem wings)
- Ozone: Emphasizes standardized inspections for airworthiness
When Should You Do Your First Laser Trim? (Most Pilots Get This Wrong)
One of the biggest missed opportunities in paraglider ownership is early trim correction.
Ozone Recommendation
Perform a trim check within the first 50 hours of flight
Why This Matters
- Lines change length quickly when new
- Trim drift happens before pilots notice
- Early correction prevents long-term deformation
Best Practice
- First trim check: 20–50 hours
- After that: every 100 hours or during inspections
What Happens During a Professional Paraglider Inspection?
A certified inspection is a complete structural and performance evaluation of your wing.
1. Laser Line Measurement & Trim

Laser Trimming a Paraglider with the Disto D5
Lines shrink and stretch over time, throwing your wing out of trim. The A & B lines carry most of your weight while the rear C & D lines carry a much lower percentage of your weight. This difference in loading usually allows the rear lines to shrink more than the front lines. Moisture, heat, dirt, UV exposure also causes lines to change length.
Can’t a shrunken paraglider line be stretched back to size?
- Measures lines to millimeter precision
- Compares against factory specs
- Adjusts lengths to restore geometry
Result:
- Cleaner launches
- Faster, more efficient glide
- Stable, predictable handling
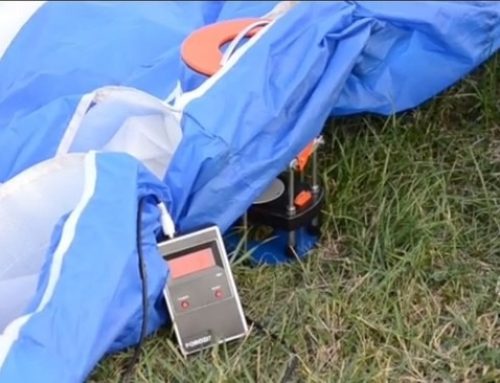
2. Line Strength Testing

Load testing a paraglider line
Your lines are your lifeline.
Why is it important to test the strength of paraglider lines, and how is this testing carried out?
- In the destructive line test, the line is attached to a load cell and stretched until it breaks. If it breaks at or above the required minimum strength, it passes the test but still needs to be replaced.
- The non-destructive test is similar to the destructive test but the line is only stretched to a pre-calculated load. If it doesn’t break, it passes, and the tested line does not need to be replaced.
- Lines must meet required load ratings, those that fail must be replaced before they fail while in flight
3. Porosity Testing

Testing paraglider porosity
Porosity measures how much air passes through the fabric.
- Low porosity: strong internal pressure and performance
- High porosity: reduced lift and safety
This is one of the most common reasons wings are retired.
4. Fabric Strength Testing

Testing paraglider fabric strength
Even fabric that looks flawless can be structurally weak. A Bettsometer is used to measure its strength.
Tests evaluate:
- Tear resistance
- Structural integrity
Weak fabric increases failure risk—especially in turbulence.
5. Full Visual Inspection & Line Replacement

Paraglider-Fabric-Inspection
- Upper & lower surfaces
- Internal ribs and seams
- Line attachment points
- Risers and stitching
- Tactile and visual inspection of the lines
- Visual inspection of risers
Damaged components are repaired or replaced after receiving approval.
Dyneema lines hold their strength better than Kevlar or Aramid, but frayed sheathing from line burn can still weaken them. They also tend to shrink more than Kevlar or Aramid lines.
Kevlar and Aramid lines lose strength more quickly than Dyneema but shrink less than Dyneema.
What Does “Un-Airworthy” Mean?
A paraglider is considered un-airworthy when it no longer meets safe flight standards. It means the paraglider has defects that could affect safety, such as weak fabric, damaged lines, or incorrect geometry or trim.
Common Causes
- Failed line strength tests,
- Excessive porosity
- Severe trim deviation
- Structural or fabric damage
Important Insight
While some wings can be restored through maintenance, others must be retired.
Flying an un-airworthy wing significantly increases risk of:
- Collapse
- Stall
- Structural failure
Can I still fly my paraglider if after an inspection it is deemed as un airworthy?
No, you should not fly a paraglider deemed unairworthy.
Work With Certified Paraglider Maintenance Professionals
Professional maintenance requires:
- Precision measurement systems
- Certified processes
- Experienced technicians
406 Paragliding is an APPI-certified maintenance provider offering:
- Laser trim and line measurement
- Full inspection services
- Detailed condition reports
📞 406-539-5118
🌐 CONTACT US HERE
![]()
![]()
Final Thoughts: Paraglider Maintenance Starts Earlier Than You Think
Across the industry—Ozone, Niviuk, GIN, and NOVA—there’s clear agreement:
👉 Regular inspections and early trim checks are essential
Especially with trim drift happening in the first 50 hours, maintenance begins sooner than most pilots expect.
If:
- It’s been over a year
- You’ve never had a trim check
- Your wing doesn’t feel “quite right”
Now is the time to act.
Because when you’re in the air—
Your wing isn’t just equipment. It’s everything.

Leave A Comment